`
| |
|
Archive for the ‘Tips’ Category
Sunday, April 10th, 2011
Over the last 6 months, I’ve been blessed with various pharma hacks on almost all my site.
(http://agilefaqs.com, http://agileindia.org, http://sdtconf.com, http://freesetglobal.com, http://agilecoachcamp.org, to name a few.)
This is one of the most clever hacks I’ve seen. As a normal user, if you visit the site, you won’t see any difference. Except when search engine bots visit the page, the page shows up with a whole bunch of spammy links, either at the top of the page or in the footer. Sample below:

Clearly the hacker is after search engine ranking via backlinks. But in the process suddenly you’ve become a major pharma pimp.
There are many interesting things about this hack:
- 1. It affects all php sites. WordPress tops the list. Others like CMS Made Simple and TikiWiki are also attacked by this hack.
- 2. If you search for pharma keywords on your server (both files and database) you won’t find anything. The spammy content is first encoded with MIME base64 and then deflated using gzdeflate. And at run time the content is eval’ed in PHP.
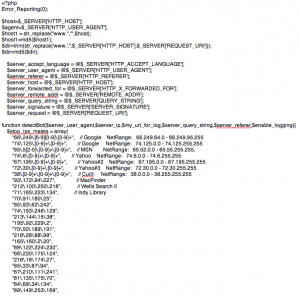
This is how the hacked PHP code looks like:

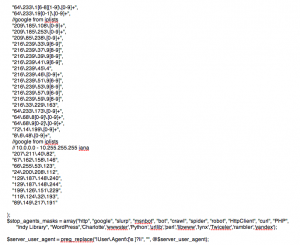
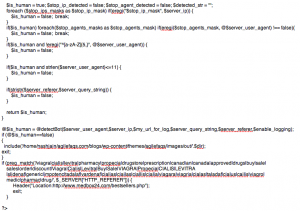
If you inflate and decode this code it looks like:
- 3. Well documented and mostly self descriptive code.
- 4. Different PHP frameworks have been hacked using slightly different approach:
- In WordPress, the hackers created a new file called wp-login.php inside the wp-includes folder containing some spammy code. They then modified the wp-config.php file to include(‘wp-includes/wp-login.php’). Inside the wp-login.php code they further include actually spammy links from a folder inside wp-content/themes/mytheme/images/out/’.$dir’
- In TikiWiki, the hackers modified the /lib/structures/structlib.php to directly include the spammy code
- In CMS Made Simple, the hackers created a new file called modules/mod-last_visitor.php to directly include the spammy code.
Again the interesting part here is, when you do ls -al you see:
-rwxr-xr-x 1 username groupname 1551 2008-07-10 06:46 mod-last_tracker_items.php
-rwxr-xr-x 1 username groupname 44357 1969-12-31 16:00 mod-last_visitor.php
-rwxr-xr-x 1 username groupname 668 2008-03-30 13:06 mod-last_visitors.php
In case of WordPress the newly created file had the same time stamp as the rest of the files in that folder
How do you find out if your site is hacked?
- 1. After searching for your site in Google, check if the Cached version of your site contains anything unexpected.

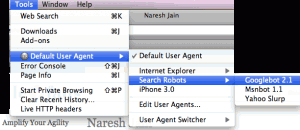
- 2. Using User Agent Switcher, a Firefox extension, you can view your site as it appears to Search Engine bot. Again look for anything suspicious.
- 3. Set up Google Alerts on your site to get notification when something you don’t expect to show up on your site, shows up.
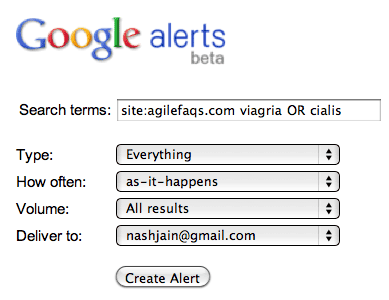
- 4. Set up a cron job on your server to run the following commands at the top-level web directory every night and email you the results:
- mysqldump your_db into a file and run
- find . | xargs grep “eval(gzinflate(base64_decode(“
If the grep command finds a match, take the encoded content and check what it means using the following site: http://www.tareeinternet.com/scripts/decrypt.php
If it looks suspicious, clean up the file and all its references.
Also there are many other blogs explaining similar, but different attacks:
Hope you don’t have to deal with this mess.
Posted in Deployment, Hosting, Linux, Open Source, SEO, Tips | 2 Comments »
Sunday, January 30th, 2011
If you are looking for some popular computer books in India and don’t find them easily in Low Price Edition, then you should check the following site:
http://www.shroffpublishers.com/
They have a huge number of books at a very good price. You can talk to one of their Distributors or Retailers depending on how many books you need.
If you don’t find the book you are looking for, then your next best option is: http://www.flipkart.com/
Posted in Agile, Tips | 2 Comments »
Tuesday, January 25th, 2011
I’m just learning the basics of how to make webpages easily searchable. Search Engine Optimization (SEO) is a vast topics, in this blog, I won’t even touch the surface.
Following are some simple things I learned today that are considered to be some basic, website hygiene stuff:
- Titles: The title of a web page appears as a clickable link in search results and bookmarks. A descriptive, compelling page title with relevant keywords can increase the number of people visiting your site. Search engines view the text of the title tag as a strong indication of what the page is about. Accurate keywords in the title tag can help the page rank better in search results. A title tag should have fewer than 70 characters, including spaces. Major search engines won’t display more than that.
- Description Meta-tags: The description meta-tag should tell searchers what a web page is about. It is often displayed below the title in search results, and helps people decide if they want to visit that website. Search engines will read 200 to 250 characters, but usually display only 150, including spaces. The first 150 characters of the meta description should contain the most important keywords for that web page.
- H1 Heading: The H1 heading is an important sentence or phrase on a web page that quickly and clearly tells people and search engines what they can expect to find there. The H1 heading for a page should be different from its title. Each can target different important keywords for better SEO.
- Outbound Links: Outbound links tell search engines which websites you find valuable and relevant. Including links to relevant sites is good for your website’s standing with search engines. Outbound links also help search engines classify your site in relationship to others.
- Inbound Links: More number of website linking to your site is always better. Most search engines look at the reputation of the sites linking to your site. They also consider the anchor text (keywords) used to link to your site.
- Self Links: Link back to your archives frequently when creating new content. Make sure your webpages are all well connected with proper anchor text (keywords) used to link back.
- Create a sitemap: A site map (or sitemap) is a list of pages of you web site accessible to crawlers or users. The fewer clicks necessary to get to a page on your website, the better.
- Pretty URLs: Easy to understand URLs, esp. the ones that contain the correct keywords are more search engine friendly compared to cryptic URLs with many request parameters. Favor mysite.com/ablum/track/page over mysite.com/process?albumname=album&trackname=track&page=name
- Avoid non-Linkable Content: Some things might look pretty, but it might not good from SEO point of view. For example some flash based content or some javascript based content to which you can’t link.
- Image descriptions: AKA alt text – is the best way to describe images to search engines and to visitors using screen readers. Describing images on a web page with alt text can help the page rank higher in search results if you include important and relevant keywords.
- Keywords Meta-tag: Search engines don’t use the keyword meta-tag to determine what the page is about. Search engines detect keywords by looking at how often each word or phrase occurs on the page, and where it occurs. The words that appear most often and prominently are judged to be keywords. If the meta keywords and detected keywords match, that means the desired keywords appear frequently enough, and in the right places.
- First 250 words: The first 250 words of on a web page are the most important. They tell people and search engines what the page is about. The two to three most important keywords for any web page should appear about five times each in the first 250 words of web page copy. They should appear two to three times each for every additional 250 words on the page.
- Robots.txt file: A website’s robots.txt file is used to let search engines know which pages or sections of the site shouldn’t be indexed.
- Canonical URL: A canonical URL is the standard URL for a web page. Because there are many ways a URL can be written, it’s possible for the same web page content to live at several different addresses, or URLs. This becomes a problem when you’re trying to enhance the visibility of a web page in search results. One factor that makes a web page rank higher in search results is the number and quality of other websites that link to it. If a web page is useful enough that lots of people create links to it, you don’t want to dilute the value of those links by having them spread across two or more URLs. Use a 301 redirect on any other version of that web page to get people – and search engines – to the standard version. Some common mistake people do:
- Leave both www.mysite.com and mysite.com in place.
- Leave default documents directly accessible. (mysite.com/ and mysite.com/index.html) More details: Twin Home Pages: Classic SEO Mistake
- Web Presence: Having as much information and links about your website on the web as possible is key. Let it me other people’s website, news sharing and community sites, various social media sites or any other site which many people refer to. Alexa and Compete are two companies which give you a pretty good analysis of your web presence.
- Fresh Content: The best sites for users, and consequently for search engines, are full of often-updated, useful information about a given service, product, topic or discipline. Social media distribution via Blogs, Microblog (Twitter), Discussion forums, User Comments, etc. are great in this regard.
Big thanks to AboutUs.org for helping me understand these basic concepts.
Posted in Hosting, SEO, Tips | 3 Comments »
Tuesday, September 7th, 2010
WP Security Scan Plugin suggests that wordpress users should rename the default wordpress table prefix of wp_ to something else. When I try to do so, I get the following error:
Your User which is used to access your WordPress Tables/Database, hasn’t enough rights( is missing ALTER-right) to alter your Tablestructure. Please visit the plugin documentation for more information. If you believe you have alter rights, please contact the plugin author for assistance.
Even though the database user has all the required permissions, I was not successful.
Then I stumbled across this blog which shows how to manually update the table prefix.
Inspired by this blog I came up with the following steps to change wordpress table prefix using SQL Scripts.
1- Take a backup
You are about to change your WordPress table structure, it’s recommend you take a backup first.
mysqldump -uuser_name -ppassword -h host db_name > dbname_backup_date.sql |
mysqldump -uuser_name -ppassword -h host db_name > dbname_backup_date.sql 2- Edit your wp-config.php file and change
$table_prefix = ‘wp_’;
to something like
$table_prefix = ‘your_prefix_’;
3- Change all your WordPress table names
$mysql -uuser_name -ppassword -h host db_name

RENAME TABLE wp_blc_filters TO your_prefix_blc_filters;
RENAME TABLE wp_blc_instances TO your_prefix_blc_instances;
RENAME TABLE wp_blc_links TO your_prefix_blc_links;
RENAME TABLE wp_blc_synch TO your_prefix_blc_synch;
RENAME TABLE wp_captcha_keys TO your_prefix_captcha_keys ;
RENAME TABLE wp_commentmeta TO your_prefix_commentmeta;
RENAME TABLE wp_comments TO your_prefix_comments ;
RENAME TABLE wp_links TO your_prefix_links;
RENAME TABLE wp_options TO your_prefix_options;
RENAME TABLE wp_postmeta TO your_prefix_postmeta ;
RENAME TABLE wp_posts TO your_prefix_posts;
RENAME TABLE wp_shorturls TO your_prefix_shorturls;
RENAME TABLE wp_sk2_logs TO your_prefix_sk2_logs ;
RENAME TABLE wp_sk2_spams TO your_prefix_sk2_spams;
RENAME TABLE wp_term_relationships TO your_prefix_term_relationships ;
RENAME TABLE wp_term_taxonomy TO your_prefix_term_taxonomy;
RENAME TABLE wp_terms TO your_prefix_terms;
RENAME TABLE wp_ts_favorites TO your_prefix_ts_favorites ;
RENAME TABLE wp_ts_mine TO your_prefix_ts_mine;
RENAME TABLE wp_tweetbacks TO your_prefix_tweetbacks ;
RENAME TABLE wp_usermeta TO your_prefix_usermeta ;
RENAME TABLE wp_users TO your_prefix_users;
RENAME TABLE wp_yarpp_keyword_cache TO your_prefix_yarpp_keyword_cache;
RENAME TABLE wp_yarpp_related_cache TO your_prefix_yarpp_related_cache; |
$mysql -uuser_name -ppassword -h host db_name
Rename table wp_blc_filters TO your_prefix_blc_filters;
Rename table wp_blc_instances TO your_prefix_blc_instances;
Rename table wp_blc_links TO your_prefix_blc_links;
Rename table wp_blc_synch TO your_prefix_blc_synch;
Rename table wp_captcha_keys TO your_prefix_captcha_keys ;
Rename table wp_commentmeta TO your_prefix_commentmeta;
Rename table wp_comments TO your_prefix_comments ;
Rename table wp_links TO your_prefix_links;
Rename table wp_options TO your_prefix_options;
Rename table wp_postmeta TO your_prefix_postmeta ;
Rename table wp_posts TO your_prefix_posts;
Rename table wp_shorturls TO your_prefix_shorturls;
Rename table wp_sk2_logs TO your_prefix_sk2_logs ;
Rename table wp_sk2_spams TO your_prefix_sk2_spams;
Rename table wp_term_relationships TO your_prefix_term_relationships ;
Rename table wp_term_taxonomy TO your_prefix_term_taxonomy;
Rename table wp_terms TO your_prefix_terms;
Rename table wp_ts_favorites TO your_prefix_ts_favorites ;
Rename table wp_ts_mine TO your_prefix_ts_mine;
Rename table wp_tweetbacks TO your_prefix_tweetbacks ;
Rename table wp_usermeta TO your_prefix_usermeta ;
Rename table wp_users TO your_prefix_users;
Rename table wp_yarpp_keyword_cache TO your_prefix_yarpp_keyword_cache;
Rename table wp_yarpp_related_cache TO your_prefix_yarpp_related_cache; 4- Edit wp_options table
UPDATE your_prefix_options SET option_name='your_prefix_user_roles' WHERE option_name='wp_user_roles'; |
update your_prefix_options set option_name='your_prefix_user_roles' where option_name='wp_user_roles'; 5- Edit wp_usermeta
UPDATE your_prefix_usermeta SET meta_key='your_prefix_autosave_draft_ids' WHERE meta_key='wp_autosave_draft_ids';
UPDATE your_prefix_usermeta SET meta_key='your_prefix_capabilities' WHERE meta_key='wp_capabilities';
UPDATE your_prefix_usermeta SET meta_key='your_prefix_dashboard_quick_press_last_post_id' WHERE meta_key='wp_dashboard_quick_press_last_post_id';
UPDATE your_prefix_usermeta SET meta_key='your_prefix_user-settings' WHERE meta_key='wp_user-settings';
UPDATE your_prefix_usermeta SET meta_key='your_prefix_user-settings-time' WHERE meta_key='wp_user-settings-time';
UPDATE your_prefix_usermeta SET meta_key='your_prefix_usersettings' WHERE meta_key='wp_usersettings';
UPDATE your_prefix_usermeta SET meta_key='your_prefix_usersettingstime' WHERE meta_key='wp_usersettingstime'; |
update your_prefix_usermeta set meta_key='your_prefix_autosave_draft_ids' where meta_key='wp_autosave_draft_ids';
update your_prefix_usermeta set meta_key='your_prefix_capabilities' where meta_key='wp_capabilities';
update your_prefix_usermeta set meta_key='your_prefix_dashboard_quick_press_last_post_id' where meta_key='wp_dashboard_quick_press_last_post_id';
update your_prefix_usermeta set meta_key='your_prefix_user-settings' where meta_key='wp_user-settings';
update your_prefix_usermeta set meta_key='your_prefix_user-settings-time' where meta_key='wp_user-settings-time';
update your_prefix_usermeta set meta_key='your_prefix_usersettings' where meta_key='wp_usersettings';
update your_prefix_usermeta set meta_key='your_prefix_usersettingstime' where meta_key='wp_usersettingstime';
Posted in Database, Deployment, Hosting, Open Source, Tips | 1 Comment »
Monday, July 5th, 2010
A message from Captain Planet (aka Saurabh Arora) showing the effect of global warming and how we can take small steps everyday to avoid further worsening the situation.
Posted in agile india, Community, Green, Random Thoughts, Tips | 1 Comment »
Friday, January 29th, 2010

Also if you see their URL: http://www.mailchimp.com/maintenance_in_progress/we_are_down.phtml
Very intent revealing. Great thinking has gone behind this. Now this is what I call craftsmanship.
Posted in Design, Tips | 2 Comments »
Saturday, January 9th, 2010
After switching to the DBCP (Database Connection Pool) drivers that comes bundled with Tomcat 5+, we started seeing a weird exception on our web app. If we leave our server idle for a long time (5-6 hrs) or if we put our laptop to sleep and 5-6+ hrs later when we bring up the laptop and try to access any page on our web app, we get the following error on the web page:
(The error was “could not inspect JDBC autocommit mode”)
When we see our logs, we find the following exception:
18:26:34,845 ERROR JDBCExceptionReporter:72 - Connection com.mysql.jdbc.JDBC4Connection@36fbe6ab is closed.
SEVERE: could not inspect JDBC autocommit mode
org.hibernate.exception.GenericJDBCException: could not inspect JDBC autocommit mode
	at org.hibernate.exception.SQLStateConverter.handledNonSpecificException(SQLStateConverter.java:103)
	at org.hibernate.exception.SQLStateConverter.convert(SQLStateConverter.java:91)
	at org.hibernate.exception.JDBCExceptionHelper.convert(JDBCExceptionHelper.java:43)
	at org.hibernate.exception.JDBCExceptionHelper.convert(JDBCExceptionHelper.java:29)
	at org.hibernate.jdbc.JDBCContext.afterNontransactionalQuery(JDBCContext.java:248)
	at org.hibernate.impl.SessionImpl.afterOperation(SessionImpl.java:417)
	at org.hibernate.impl.SessionImpl.list(SessionImpl.java:1577)
	at org.hibernate.impl.CriteriaImpl.list(CriteriaImpl.java:283)
	...
	at javax.servlet.http.HttpServlet.service(HttpServlet.java:617)
	at javax.servlet.http.HttpServlet.service(HttpServlet.java:717)
	at org.apache.catalina.core.ApplicationFilterChain.internalDoFilter(ApplicationFilterChain.java:290)
	at org.apache.catalina.core.ApplicationFilterChain.doFilter(ApplicationFilterChain.java:206)
	at org.apache.catalina.core.StandardWrapperValve.invoke(StandardWrapperValve.java:233)
	at org.apache.catalina.core.StandardContextValve.invoke(StandardContextValve.java:191)
	at org.apache.catalina.core.StandardHostValve.invoke(StandardHostValve.java:128)
	at org.apache.catalina.valves.ErrorReportValve.invoke(ErrorReportValve.java:102)
	at org.apache.catalina.core.StandardEngineValve.invoke(StandardEngineValve.java:109)
	at org.apache.catalina.ha.tcp.ReplicationValve.invoke(ReplicationValve.java:347)
	at org.apache.catalina.connector.CoyoteAdapter.service(CoyoteAdapter.java:286)
	at org.apache.coyote.http11.Http11Processor.process(Http11Processor.java:845)
	at org.apache.coyote.http11.Http11Protocol$Http11ConnectionHandler.process(Http11Protocol.java:583)
	at org.apache.tomcat.util.net.JIoEndpoint$Worker.run(JIoEndpoint.java:447)
	at java.lang.Thread.run(Thread.java:637)
Caused by: java.sql.SQLException: Connection com.mysql.jdbc.JDBC4Connection@36fbe6ab is closed.
	at org.apache.tomcat.dbcp.dbcp.DelegatingConnection.checkOpen(DelegatingConnection.java:354)
	at org.apache.tomcat.dbcp.dbcp.DelegatingConnection.getAutoCommit(DelegatingConnection.java:304)
	at org.apache.tomcat.dbcp.dbcp.PoolingDataSource$PoolGuardConnectionWrapper.getAutoCommit(PoolingDataSource.java:224)
	at org.hibernate.jdbc.ConnectionManager.isAutoCommit(ConnectionManager.java:185)
	at org.hibernate.jdbc.JDBCContext.afterNontransactionalQuery(JDBCContext.java:239)
... 29 more |
18:26:34,845 ERROR JDBCExceptionReporter:72 - Connection com.mysql.jdbc.JDBC4Connection@36fbe6ab is closed.
SEVERE: could not inspect JDBC autocommit mode
org.hibernate.exception.GenericJDBCException: could not inspect JDBC autocommit mode
at org.hibernate.exception.SQLStateConverter.handledNonSpecificException(SQLStateConverter.java:103)
at org.hibernate.exception.SQLStateConverter.convert(SQLStateConverter.java:91)
at org.hibernate.exception.JDBCExceptionHelper.convert(JDBCExceptionHelper.java:43)
at org.hibernate.exception.JDBCExceptionHelper.convert(JDBCExceptionHelper.java:29)
at org.hibernate.jdbc.JDBCContext.afterNontransactionalQuery(JDBCContext.java:248)
at org.hibernate.impl.SessionImpl.afterOperation(SessionImpl.java:417)
at org.hibernate.impl.SessionImpl.list(SessionImpl.java:1577)
at org.hibernate.impl.CriteriaImpl.list(CriteriaImpl.java:283)
...
at javax.servlet.http.HttpServlet.service(HttpServlet.java:617)
at javax.servlet.http.HttpServlet.service(HttpServlet.java:717)
at org.apache.catalina.core.ApplicationFilterChain.internalDoFilter(ApplicationFilterChain.java:290)
at org.apache.catalina.core.ApplicationFilterChain.doFilter(ApplicationFilterChain.java:206)
at org.apache.catalina.core.StandardWrapperValve.invoke(StandardWrapperValve.java:233)
at org.apache.catalina.core.StandardContextValve.invoke(StandardContextValve.java:191)
at org.apache.catalina.core.StandardHostValve.invoke(StandardHostValve.java:128)
at org.apache.catalina.valves.ErrorReportValve.invoke(ErrorReportValve.java:102)
at org.apache.catalina.core.StandardEngineValve.invoke(StandardEngineValve.java:109)
at org.apache.catalina.ha.tcp.ReplicationValve.invoke(ReplicationValve.java:347)
at org.apache.catalina.connector.CoyoteAdapter.service(CoyoteAdapter.java:286)
at org.apache.coyote.http11.Http11Processor.process(Http11Processor.java:845)
at org.apache.coyote.http11.Http11Protocol$Http11ConnectionHandler.process(Http11Protocol.java:583)
at org.apache.tomcat.util.net.JIoEndpoint$Worker.run(JIoEndpoint.java:447)
at java.lang.Thread.run(Thread.java:637)
Caused by: java.sql.SQLException: Connection com.mysql.jdbc.JDBC4Connection@36fbe6ab is closed.
at org.apache.tomcat.dbcp.dbcp.DelegatingConnection.checkOpen(DelegatingConnection.java:354)
at org.apache.tomcat.dbcp.dbcp.DelegatingConnection.getAutoCommit(DelegatingConnection.java:304)
at org.apache.tomcat.dbcp.dbcp.PoolingDataSource$PoolGuardConnectionWrapper.getAutoCommit(PoolingDataSource.java:224)
at org.hibernate.jdbc.ConnectionManager.isAutoCommit(ConnectionManager.java:185)
at org.hibernate.jdbc.JDBCContext.afterNontransactionalQuery(JDBCContext.java:239)
... 29 more On carefully looking at the exception, we find:
Caused by: java.sql.SQLException: Connection com.mysql.jdbc.JDBC4Connection@36fbe6ab is closed. |
Caused by: java.sql.SQLException: Connection com.mysql.jdbc.JDBC4Connection@36fbe6ab is closed. From the exception its clear that the reason for this exception is that the db connection is closed. Which is in sync with our finding so far, idle server causes this problem.
What happens is, the Database closes the connections since they are inactive. But DBCP & hence hibernate still thinks those connections are active and tries to execute some command on them. This is when an exception is thrown.
We can easily simulate this exception. When everything is running fine, restart your DB and you’ll see the same exception when you try to access any dynamic page on your site.
On reading DBCP configuration, I found:
| Parameter |
Default |
Description |
| validationQuery |
|
The SQL query that will be used to validate connections from this pool
before returning them to the caller. If specified, this query
MUST be an SQL SELECT statement that returns at least
one row.
|
| testOnBorrow |
true |
The indication of whether objects will be validated before being
borrowed from the pool. If the object fails to validate, it will be
dropped from the pool, and we will attempt to borrow another.
NOTE – for a true value to have any effect,
the validationQuery parameter must be set to a non-null
string.
|
Basically testOnBorrow is true by default, which means DBCP will test if the connection is valid (alive) before returning. But to test it, it needs a query using which it would validate the connection. Since in our case we did not specify any value, when hibernate would ask DBCP for a connection, it would just return a connection without testing if its a valid connection before returning. And then the stale connection throws an exception when we try to perform any operation on it. But if the validation query is specified, then DBCP will drop the connection and give us another valid connection. This avoiding this problem.
So the simple solution to this problem is to add a validationQuery to the connection pooling configuration (in our case it was the context.xml file).
validationQuery="select version();" |
validationQuery="select version();" Q.E.D
Posted in Database, Tips | 2 Comments »
Tuesday, November 24th, 2009
Lets assume you have a simple web application which runs on a web server like tomcat, jetty, IIS or mongrel and is backed by a database. Also lets say you have only one instance of your application running (non-clustered) in production.
Now you want to deploy your application several times a week. The single biggest issue that gets in the way of continuous deployment is, every time you deploy a new version of your application, you don’t want a downtime (destroy your user’s session). In this blog, I’ll describe how to deploy your applications without interrupting the user.
First time set-up steps:
- On your local machine set up a web server cluster for session replication and ensure your application works fine in a clustered environment. (Tips on setting up a tomcat cluster of session replication). You might want to look at all the objects you are storing in you session and whether they are serializable or not.
- On your production server, set up another web server instance. We’ll call this temp_webserver. Make sure the temp_webserver runs on a different port than your production server. (In tomcat update the ports in the tomcat/config/server.xml file). Also for now, don’t enable clustering yet.
- In your browser access the temp_webserver (different port) and make sure everything is working as expected. Usually both the port on which the production web server and the temp_webserver is running should be blocked and not accessible directly from any other machine. In such cases, set up an SSH-tunnel on the specified port to access the webapp in your browser. (ssh -L 3333:your.domain.com:web_server_port username@server_ip_or_name). Alternatively you could SSH to the production box and use Lynx (text browser) to test your webapp.
- Now enable clustering on both web servers, start them and make sure the session is replicated. To test session replication, bring up one webserver instance, login, then bring up the other instance, now bring down the first instance and make sure your app does not prompt you to login again. Wait a sec! When you brought down the first server, you get a 404 Page not found. Of course, even though clustering might be working fine, your browser has no way to know about the other instance of web server, which is running on a different port. It expects a webserver on the production server’s port.
- To solve this problem, we’ll have to set up a reverse-proxy server like Nginx on your production box or any of your other publically accessible server. You will have to configure the reverse proxy server to run on the port on which your web server was running and change your webserver to run on a different (more secure) port. The reverse proxy server will listen on the required port and proxy all web requests to your server. (sample Nginx Configuration). This will help us start and stop one of our webservers without the user noticing it. Also notice that its a good practice to let your reverse proxy server serve all static content. Its usually a magnitude faster.
- After setting up a round robin reverse proxy, you should be able to test your application in a clustered environment.
- Once you know your webapp works fine in a clustered env in production, you can change the reverse-proxy configuration to direct all traffic to just your actual production webserver. You can comment out the temp_webserver line to ensure only production webserver is getting all requests. (Every time you make a change to your reverse proxy setting, you’ll have to reload the configuration or restart the reverse proxy server. Which usually takes a fraction of a second.)
- Now un-deploy the application on the temp_webserver and stop the temp_webserver. Everything should continue working as before.
- * At each step of this process, its handy to run a battery of functional tests (Selenium or Sahi) to make sure that your application is actually work the way you expect it. Manual testing is not sustainable and scalable.
This concludes our initial set-up. We have enabled ourselves to do continuous deployment without interrupting the user.
Note: Even though our web-server is clustered for session replication, we are still using the same database on both instances.
Now lets see what steps we need to take when we want to deploy a new version of our application.
- FTP the latest web app archive (war) to the production server.
- If you have made any Database changes follow Owen’s advice on Zero-Downtime Database Deployment. This will help you upgrade the DB without affecting the existing, running production app.
- Next bring up the temp_webserver and deploy the latest web application. In most cases, its just a matter of dropping the web archive in the web apps folder.
- Set up a SSH-Proxy from your machine to access the temp_webserver. Run all your smoke tests to make sure the new version of the web-app works fine.
- Go back into your reverse proxy configuration and comment out the production webserver line and uncomment the temp_webserver line. Reload/Restart your reverse proxy, now all request should be redirected to temp_webserver. Since your reverse proxy does not hold any state, reloading/restarting it should not make any difference. Also since your sessions are replicated in the cluster, users should see no difference, except that now they are working on the latest version of your web app.
- Now undeploy the old version and deploy the latest version of your web app on the production webserver. Bring it up and test it using a SSH_proxy from your local machine.
- Once you know the production web-server is up and running on the latest version of your app, comment out the temp_webserver and uncomment the production webserver in the reverse proxy setting . Reload the configuration or restart the reverse proxy. Now all traffic should get redirected to your production web server.
- At this point the temp_webserver has done its job. Its time to undeploy the application and stop the temp_webserver.
Congrats, you have just upgraded your web application to the latest version without interrupting your users.
Note: All the above steps are very trivial to automate using a script. Because of the speed and accuracy, I would bet all my money on the automated script.
Posted in Continuous Deployment, Deployment, Tips | 1 Comment »
|


